Showing posts with label cooking. Show all posts

Tuesday, 3 July 2012

Rhabarber Kuchen


It was time for done baking, and armed with an armful of rhubarb and a shiny new German baking book "Heimweh-Küche - Backen “ I set to making Rhabarber Kuchen...

It's a very straightforward recipe but very very satisfying, the fruit is just coated in jam with no other sugar, leading to very juicy and sour fruit, which contrasts well with the sweet cake.

I was very happy with the result and look forward to trying more of the recipes!
 

Monday, 8 August 2011

Happiness soup, yummy lentil burgers, and shelves!

This weekend my family came to visit, and as well as catching up and having fun there was lots of eating. Also my awesome dad put up some shelves for us in the kitchen, my cookery books no longer need to lie down on the dresser, they're now on display in a more useful way!

Woohoo!

To feed a family with two vegetarians, one peanut allergic, and one on a gluten-free diet can be tricksy, but on Sunday we happily munched on lentil, rice and nut burgers with guacamole, and fried eggs and homemade coleslaw (made by mum) on the side - yummy!


I invented the recipe a while back to use up some leftover rice and it goes something like this (be aware it makes a lot! you can always halve the quantities):-

200 g lentilles vertes (puy lentils would also work) - boiled.
1 portion cooked brown basmati (~150 g cooked)
1 medium onion
100 g cashew nuts
50 g sunflower seeds
2 eggs
3 cloves garlic
~5 mushrooms (optional)
EITHER mushroom ketchup or soy sauce
sage
thyme
chives
salt
pepper
soy flour to bind (optional)

Blend ingredients in food processor, fry a small bit of mixture and taste for seasoning, adjust to taste.
The first time I made these I used mushrooms, soy flour and mushroom ketchup, having toyed with various seasonings.  This time, I'd run out of mushrooms and mushroom ketchup and used soy sauce instead. With the mushrooms and mushroom ketchup the mixture was a bit wet, so I used soy flour to bind the mixture and add extra protein. With soy sauce the mixture was fine without the soy flour. 
Shallow fry the mixture as patties and enjoy! They're nice hot or cold, and with the nuts and lentils are nice and filling.

For Sunday dinner Chris and I decided to harvest some of our homegrown produce -

Yummy Yellow Courgette.
With our 450 g giant courgette we decided to make Happiness Soup, one of our favourite recipes from Nigella Lawson's Forever Summer. This soup really lives up to its name and made us feel summery and happy even though there was torrential rain outside.

We ate our fluorescent yellow soup with some freshly-baked bread.

Courgette soup for the soul.
To make the meal even more perfect we followed this up with apple crumble :-)


Happy days.

Tuesday, 2 August 2011

Jammy!

Over the weekend I was a busy bee making jam.
Our lovely neighbour gave us a big bag of yellow plums from her garden, as she's had a bumper crop this year. Also, we've had lots of rhubarb (our garden's big success this year), so roll on plum jam and rhubarb jam...


For both recipes I used my 1970's copy of the Good Housekeeping cookery book, which is filled with lots of wonderful recipes and used the "plum jam" recipe for the plums. Here are the jars of jam:-


I used the pressure cooker to cook the plums, in the hopes that their colour would stay better if I cooked them under pressure for 5 min vs. 30-50 min in a normal pan. As the pressure cooker is stainless steel, it's also the ideal place to make the jam.

While the plums cooked I found a recipe to use the rhubarb in, the imaginatively named "Rhubarb Ginger" which, believe it or not, has rhubarb and ginger in it.

Here's some of the rhubarb:-
Yay - we grew this!

There was no added water in the recipe, and the way to deal with this was to prepare the rhubarb the day before making the jam, by chopping it up and layering it with the sugar:-
This was covered with a tea-towel and left overnight, and by the magical process of osmosis the water from the rhubarb seeped out into the sugar, and made it all ready to cook.

Fresh ginger was cooked in with the rhubarb and then removed, crystallised ginger (made by cooking fresh ginger in sugar syrup) was added for the jamming process. My jam thermometer was great for the process, and I learnt with the plum jam to trust it more (it didn't seem to be setting so I boiled it longer, ignoring the thermometer, and the plum jam is now set rock solid).

Here's a picture of my final hoard from a weekend boiling fruit in sugar:-


Yum!

Wednesday, 20 April 2011

Pasteis de nata (yum) and dress progress

Last night I decided it was time to try making Pasteis de Nata again (traditional Portuguese custard tarts). Last time they were nice, but I'd used too much pastry and in my old oven the filling didn't cook how I wanted it to.

This time, they were a success!!
I followed the recipe here - except I made a few tweaks of my own.

Here is the recipe as I followed it:-

Ingredients 
3 egg yolks
100 g ground xylitol (instead of caster sugar, I ground the xylitol in my herb chopper to make "caster xylitol")
2 tbsp cornflour
230 ml single cream
170 ml milk
2 tsp vanilla extract
250 g puff pastry (I bought a block of pastry, chopped it in half and rolled one half out and froze the other for later)

Method
Over a medium heat I mixed and stirred the egg yolks, xylitol, cream, milk and vanilla extract. With a little bit of the cold milk I mixed up the cornflour into a smooth paste and then added this to the cooking custard. I mixed the custard until it thickened, then took it off the heat and left it to cool.


For the pastry I rolled out 250g then sprinkled it with cinnamon and icing sugar. I then cut the pastry in two rolled up the pastry pieces into a long thin sausage like snail, and cut 1.5-2 cm pieces of pastry. With each of these, I turned them on their side, so you could see the spiral shape, and then rolled it into a flat circle of around 10 cm diameter. This was then pressed into a greased fairy cake tin and filled with about a dessertspoonful of custard. The tarts were then baked at 200 C (in a fan oven) for 20-25 minutes, and this is what they looked like..


Unlike in my old oven, where they wouldn't brown on top (as the bottom had already burnt) here the pastry is nicely cooked and the filling nicely browned on top. YUM!

Chris approved...
In the lab today, the two Portuguese thoroughly approved, so success all round i'd say :)


I've also been working on the real bridesmaids dress.. the mock-up is still somewhere in the post on its way back from America, so I'm having to remember where I put all of the seamlines last time, but it's coming together..

Friday, 4 March 2011

Fake and Kidding Pudding

As promised, the recipe for fake and kidding pudding!

This recipe was developed by adapting the steak and kidney pudding recipe from how to be a domestic goddess and the recipe book that came with my pressure cooker. The process is as follows..

Ingredients

For the filling:-
1 packet (~300g)  sainsbury's frozen veggie mince (or Realeat veggie mince, i don't like Quorn mince)
150 g button mushrooms, sliced
1 large onion, finely chopped
1/2 teaspoon mustard powder
2 tablespoons mushroom ketchup
4 teaspoons vegetarian gravy powder
Enough water to make a 'gravy'
Oil for frying the onions

For the pastry:-
175 g  wholemeal self-raising flour (I like the doves farm one), you can use white flour, i just like to use wholemeal where possible.
pinch of salt
87 g vegetable suet
1/2 teaspoon mustard powder
water to make a dough

3 pint pudding basin (the plastic ones with clip on lids are easier, but i lost my lid..)
If you have a traditional pudding basin, you will also need string and tin-foil.
Pressure cooker, or big pan.

Cooking times
Filling ~20 min
If you are using a pressure cooker the pudding will take about 40 minutes, if you need to use a normal pan then steaming will take 2-2 1/2 hours.


Method
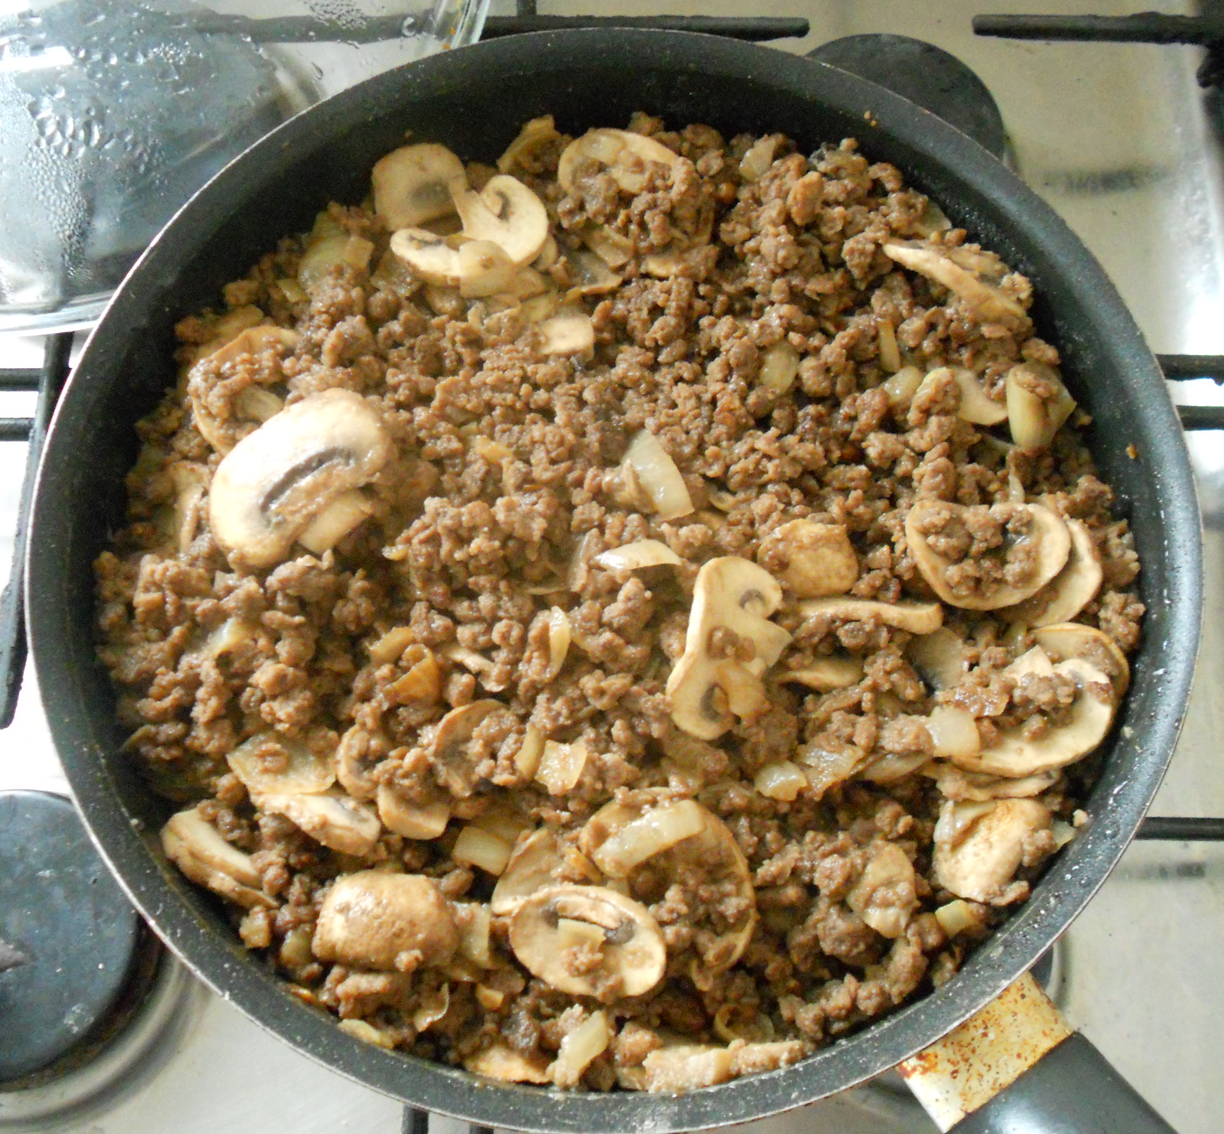
Fry the onion until slightly browned, then add the mince and musrooms. As things cook down add the gravy powder, mushroom ketchup and mustard powder and cook until it looks something like this -


I made the filling the day before, as this allows the flavours to develop better, but you can use the filling straight away. If using the same day, add enough water to make a bit of gravy in the pan, if using the next day do this just before assembling your pudding.

The next step is to make the pastry, which is easy peasy..
Grease your pudding bowl. Really well. There's nothing quite so disappointing as making a lovely pudding then when you tip it out of the basin, the pastry sticks and it all collapses..
If you have no pressure cooker then get your pan-full of water boiling now!, you'll need plenty. If you have a pressure cooker, just pop the kettle on (you won't need so much water) or put ~800 ml in the pan and bring to the boil.

Mix the flour, salt, mustard powder and suet in a bowl and then add enough water to make a firm dough. Roll out on a floured surface until it's about half a centimetre thick and then line the pudding basin, make sure you have enough left for the lid.

Pour your filling into the pastry-lined bowl, and then add a pastry lid taking pains to make sure the edges are well sealed.


If you have a plastic pudding bowl then the next step is easy, snap the lid on top and make sure it's shut all the way round. If, like me, you have a traditional pudding basin then you need to get out the string and tin-foil, and butter a piece of foil, make a pleat in it and then put it over the top of the basin. Using string attach the foil lid to the basin as shown below. Try to make yourself a string handle while you're at it, this will make pudding retrieval that much easier..


Now you are ready to cook your pudding!
For pressure cooker owners pop the water in the pan and then the pudding. Put the lid on and steam the pudding for ten minutes and then bring to pressure and cook for a further 25-30 minutes.

If you have no pressure cooker then immerse the pudding in the pan-full of water (not completely!) or in a steamer above the water and cook for 2-2 1/2 hours, keeping an eye on the water levels.

Once the pudding is cooked, snip the string (or pop off the lid) and reveal your pudding. Run a knife round the edge to make sure the pastry will come free from the basin and then pop a plate on top and flip to get your pudding on a plate. Gently remove the basin from the pudding (it's hot!) and lo and behold you will have a fake and kidding pudding!


Enjoy!